Automating Data Deduplication in Snowflake with Tilores

TL;DR
- Identity resolution fits between raw customer tables and downstream analytics by assigning a stable entity_id to records that describe the same real customer, company, account, or other entity.
- In the Snowflake pattern shown here, Snowflake keeps initiating the work: new rows are processed, Tilores resolves likely matches, and the resolved entity_id is written back for joins, segmentation, and abuse detection.
- Use this pattern when exact-match SQL deduplication is too brittle because customers change names, email domains, spelling, or registration details across rows.
Table of Contents
- Short answer
- Next step with Tilores
- Decision guide
- Where does identity resolution belong in a Snowflake data workflow?
- What changes once every customer row has an entity_id?
- Why is this different from simple SQL deduplication?
- How does the pattern translate beyond one Snowflake example?
- What should data teams validate before production use?
- Frequently Asked Questions
Short answer
Identity resolution belongs in the modern data stack as an enrichment layer that turns duplicate or near-duplicate customer rows into durable entity identifiers. Snowflake or a lakehouse platform can still store the raw data and run the transformations, while the identity-resolution step decides which rows represent the same real-world entity.
For this article's Snowflake workflow, the practical output is an entity_id stored beside customer records in a customers_entities table. Downstream teams can then join on the entity_id instead of treating every slightly different email, name, or domain as a separate customer.
Next step with Tilores
Use the next step that matches your evaluation stage.
Decision guide
| Question | Use Tilores when | Watch-outs |
|---|---|---|
| Where should identity resolution sit in the data stack? | Place it after raw customer records land and before downstream analytics, segmentation, fraud checks, or AI context retrieval depend on those records. | Do not replace the warehouse or lakehouse. Keep Snowflake, Databricks, or the chosen platform as the system that stores and governs the analytical data. |
| When is warehouse-only deduplication enough? | Use Tilores when records differ by spelling, domain, address, name order, or registration pattern and still need to collapse to one entity_id. | Exact SQL rules can be useful for obvious duplicates, but they can miss fuzzy duplicates or create false confidence when identifiers change. |
| What should be written back to Snowflake? | Write a stable entity_id and enough source-row context to let analysts inspect which input rows were grouped together. | Do not hide the matching result inside an opaque process. Data teams need traceability for review, debugging, and downstream trust. |
| How should teams test the pattern? | Start with a duplicated customer table, inspect the grouped entity IDs, then add near-duplicate records and confirm they attach to the expected entity. | Review false positives and false negatives before relying on the IDs for automated customer suppression, free trial abuse, or marketing segmentation. |
Where does identity resolution belong in a Snowflake data workflow?
Identity resolution should sit between ingestion and consumption: raw customer rows arrive first, matching runs next, and the resolved entity_id becomes available before BI, marketing, fraud, or customer 360 workflows read the data.
That placement keeps Snowflake responsible for orchestration and storage while giving downstream queries a cleaner join key than name, email, or account fields alone.
What changes once every customer row has an entity_id?
The entity_id turns a group of messy rows into a queryable customer identity. Analysts can count actual customers, segment by resolved entities, and detect repeated signup patterns without rebuilding fuzzy matching logic in every report.
For abuse detection, the same identifier helps expose cases where one person or company creates multiple accounts with small variations in registration details.
Why is this different from simple SQL deduplication?
SQL deduplication is strongest when records share exact keys or predictable formatting. Identity resolution is needed when duplicates are approximate: changed domains, typos, nickname variants, reordered names, and partial fields can all break exact-match rules.
A practical data-stack design can still keep deterministic SQL checks, but it should not rely on them as the only method for resolving customer identity when the business problem is fuzzy.
How does the pattern translate beyond one Snowflake example?
The reusable architecture is platform-neutral: keep raw records in the warehouse or lakehouse, resolve entities as part of the data pipeline, then store the resolved identifier where downstream tools can query it.
Implementation details vary by platform, so the article should keep the concrete walkthrough focused on Snowflake while making clear that the data-stack role is the same: identity resolution supplies the customer key that raw tables often lack.
What should data teams validate before production use?
Before using entity IDs in production, teams should sample matched groups, inspect edge cases, and confirm that the identifiers behave correctly for both obvious duplicates and near-duplicates.
The goal is not just to reduce row counts. The goal is to make customer-level decisions more reliable while preserving enough source context to audit how records were grouped.
Preventing Free Trial Abuse using Identity Resolution with your Snowflake Customer Data
The problem
Ending up with duplicate customer data is almost unavoidable, whether it is due to acquiring data from different sources, customers registering multiple times or mistakes made during manual data entry. Another possible cause of duplicate customer data is when customers sign up online multiple times, each time slightly changing their details, to take advantage of free trials or first-use discounts.
This leads to multiple rows in a table that represent the same customer, company or any other kind of entity. A classic identity resolution problem. So how can one solve this in Snowflake?
What to expect?
In this guide we will start with a Snowflake table that contains duplicated customer data and we will end up with another table introducing a new field (entity_id) which is a unique identifier for each customer.
An **entity_id **will be automatically calculated for any new data added to the table.
Create test table in Snowflake
Create a new worksheet and run the following:
Download the result as CSV. We will use this in the next step to automatically generate the matching rules.
Connecting Snowflake to Tilores
Use the current Tilores evaluation path instead of the old app signup link: Get the Evaluation Build for local evaluation, or Book a Demo to confirm the current cloud Snowflake setup. Then load the CSV from the previous step and follow the setup instructions for the environment you are evaluating before creating the Snowflake integration.
Now we will create an API integration which will allow Snowflake to make calls to Tilores.
Snowflake will always be the one initiating the connection, sending and requesting data from Tilores, not the other way around.
In the Tilores UI go to Integration — Snowflake and under the section “Where to get these values?” copy the code sections and run them in a new worksheet in your Snowflake workspace.
The result of the last query should have API_AWS_IAM_USER_ARN, copy the value and use it in User ARN field in Tilores UI. Also copy the value of **API_AWS_EXTERNAL_ID **and use it in External ID in Tilores UI then click **UPDATE **to activate the connection.
The following banner should show:

Now Snowflake and Tilores are connected.
Setup automatic entity identification in Snowflake
Next we will create a task which will process any new data added to the **customers **table we created at the beginning and create a row with an **entity_id **in a new table customers_entities. Run the following in Snowflake:
Testing the automation
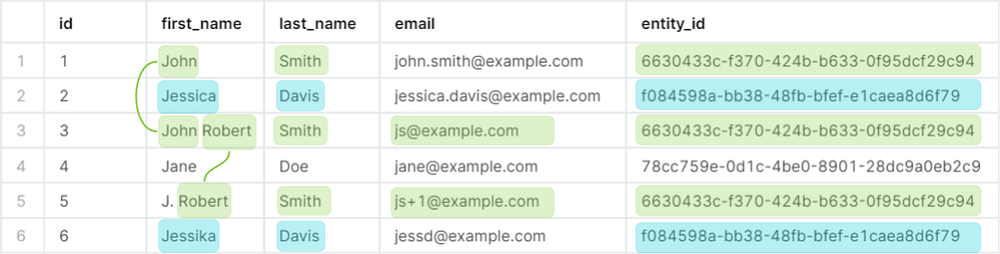
After two minutes, a row is created in customers_entities for each customer. So if we perform a join we should be able to tell which customer rows belong to which actual customer.
Should result in:
Based on the entity ids, it shows that these rows represent only three actual customers.
And if we now add another customer with a similar name and a few spelling mistakes, and a different email domain. It should end up with the same **entity_id **as the first row.
Wait two minutes, then run the following again:
The result should now be:
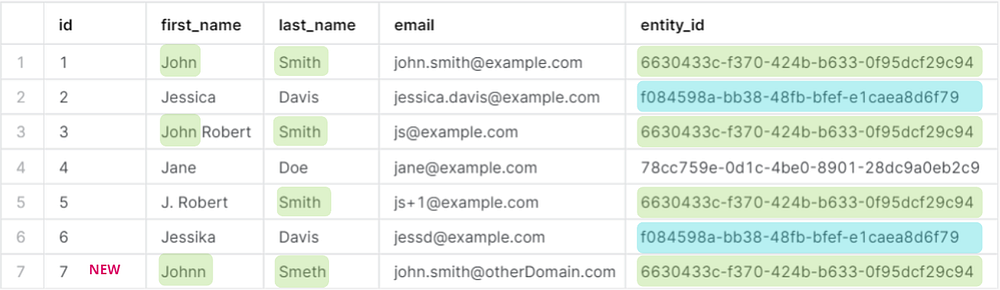
In this case entity_id is the actual customer identifier.
Conclusion - Identity Resolution in Snowflake
By introducing unique entity IDs for customers, this identity resolution approach ensures an accurate customer 360 view in Snowflake and allows for easy customer segmentation for marketing. Further use cases include detecting duplicate account creation associated with free trial abuse.
Frequently Asked Questions
- How does identity resolution fit into a modern data stack with Snowflake or Databricks?
- Identity resolution fits as an enrichment layer between raw customer data and downstream use cases. The warehouse or lakehouse stores and processes records, while the resolution layer assigns stable entity IDs that analytics, fraud, customer 360, and AI workflows can query.
- Is Snowflake deduplication enough for free trial abuse detection?
- Snowflake can support exact and rule-based deduplication, but free trial abuse often involves small changes to names, emails, domains, or other attributes. Identity resolution is better suited when the problem is finding the same real entity across near-duplicate records.
- What should a Snowflake pipeline store after customer records are resolved?
- The pipeline should store a stable entity_id beside the relevant customer records or in a linked entity table. It should also keep enough source-row context for analysts to inspect which records were grouped together.
- Can the same entity_id support customer 360 and fraud workflows?
- Yes. The same resolved entity_id can support customer 360, segmentation, suppression, and fraud-review workflows because each use case benefits from seeing the real customer or company instead of isolated duplicate rows.
Evaluate Tilores on your own data
Use the next step that matches your evaluation stage.
See what resolved entity data does for your business — and your AI.